
Online Tools for Cross-browser CSS3 Rule Generation
This week has seen the announcement of a couple of new online tools for generating cross-browser CSS3 rules, CSS3 Please! and CSS3 Generator.
CSS3 Please!, produced by Paul Irish and Jonathon Neal, aims to simplify the design process by allowing designers to enter one value, and have this instantly synced and normalised for each vendor-specific prefix, with the corresponding code generated automatically.
The tool offers support for border-radius, box-shadow, linear-gradients, rotation, rgba colors and @font-face, with work underway on support for skew and scale. In some circumstances the tool also offers support for Internet Explorer using IE filters to replicate the same effects as achieved by CSS3 properties. CSS3 Please! has been gaining a significant amount of interest around the blogosphere since its launch earlier this week.
This week has seen the announcement of a couple of new online tools for generating cross-browser CSS3 rules, CSS3 Please! and CSS3 Generator.
CSS3 Please!, produced by Paul Irish and Jonathon Neal, aims to simplify the design process by allowing designers to enter one value, and have this instantly synced and normalised for each vendor-specific prefix, with the corresponding code generated automatically.
The tool offers support for border-radius, box-shadow, linear-gradients, rotation, rgba colors and @font-face, with work underway on support for skew and scale. In some circumstances the tool also offers support for Internet Explorer using IE filters to replicate the same effects as achieved by CSS3 properties. CSS3 Please! has been gaining a significant amount of interest around the blogosphere since its launch earlier this week.

Another online CSS3 rule generator to brought to light this week, although perhaps not so well known, is Randy Jensen’s CSS3 Generator, which offers a drop down menu with subsequent options to generate and customise rules for a wide selection of CSS3 properties and functionality including border-radius, shadow, text-shadow, rgba colors, @font-face, multiple columns, box sizing and more.

Whilst these are not the first online rule generators for CSS3, westciv.com for example offers several online tools for generating rules for a selection of CSS3 properties, CSS3 Please! and the CSS3 Generator do however offer two of the most comprehensive solutions to date, particularly with regard to cross-browser compatibility, and with both still being in their infancy I’m excited to see how they develop in the future.
CSS3 Selectors Test
Is your browser compatible?
After starting the testsuite it will automatically run a large number of small tests which will determine if your browser is compatible with a large number of CSS selectors. If it is not compatible with a particular selector it is marked as such. You can click on each selector to see the results, including a small example and explaination for each of tests.Because it is technically not possible to simulate certain user interactions the test is limited to selectors that are not dependant on user interactions. So this testsuite does not include tests for the following selectors: :hover, :active, :focus and :selection.
Start the test…
CSS3 Previews
Many exciting new functions and features are being thought up for CSS3. We will try and showcase some of them on this page, when they get implemented in either Firefox, Konqueror, Opera or Safari/Webkit.
Here they are:
Here they are:
Text effects
User-interface
- box-sizing
- resize
- outline
- nav-top, nav-right, nav-bottom, nav-left
Selectors
Basic box model
- overflow-x, overflow-y
Generated Content
- content
Other modules
Blogger FTP to Custom Domain Migration
Blogger has officially announced that it would be shutting down the FTP publishing feature on March 26 2010. So the existing FTP publishers are advised to move onto Blogger Custom Domains.If you are not currently using the FTP publishing option, you can just skip this tutorial :)
Blogger has already posted about the advantages of custom domains.
2.If you are publishing your blog at some subfolder within your domain or subdomain(www.yourdomain.com/blog), then you can no longer host your blog at that address, because Custom Domains can be setup at root domain or sub-domains only.Blogger will soon release a migration tool which will help you in properly redirecting such blogs.
Can i get rid of my web-host?
If you are hosting your blog at a root level domain or sub-domain and not inside a directory and if you are have not published any images via FTP(images are hosted on other sites like flickr), then you no longer need a web-host.
1. When you move your blog to a custom domain, you will have to move all the images to a different sub-domain on your server
2.Create a new sub-domain like files.yourblog.com and move all your images to this sub-domain (For example www.yourblog.com/uploaded_images/image1.jpg should now be accessible at files.yourblog.com/uploaded_images/image2.jpg)
3.If you are using a shared hosting service, ask your host to create a Canonical Name(CNAME) record for www with value ghs.google.com
(DNS changes are cached at many levels and your ISPs may take time to get in sync with the 13 root level domain name servers. So the changes may take time :)
4.Once your host is done with it, Log in at your Blogger Dashboard and navigate to Settings > Publishing
5.Opt For Switch to: Custom Domain (Point your own registered domain name to your blog) and switch to advanced settings
6.Type your new domain/subdomain there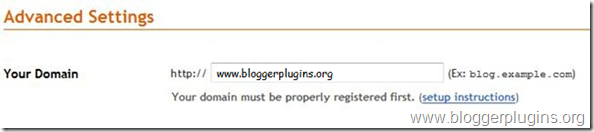 and in the missing file host option type in files
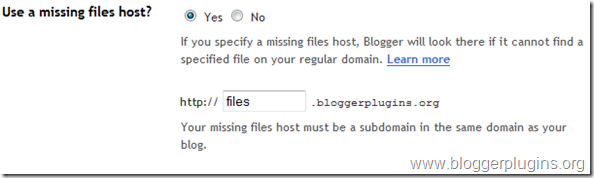
type the captcha and save the settings. If everything goes right, your blog has now been successfully moved to the custom domain.
If you are hosting your blogger blog on a sub-directory, then wait for the Blogger FTP migration tool(it will be out in a couple of weeks). Once you are done with the migration tool, just follow the steps 4-6.You wouldn't need to use a missing files host in that case.
If you have any questions about the migration, leave your questions in the comments section.
Blogger has already posted about the advantages of custom domains.
Where do you currently publish your FTP blogger blog ?
1.If you are publishing at a root level domain or sub-domain, then the things are pretty easy. (eg. www.yourblog.com or blog.yourdomain.com).2.If you are publishing your blog at some subfolder within your domain or subdomain(www.yourdomain.com/blog), then you can no longer host your blog at that address, because Custom Domains can be setup at root domain or sub-domains only.Blogger will soon release a migration tool which will help you in properly redirecting such blogs.
Can i get rid of my web-host?
If you are hosting your blog at a root level domain or sub-domain and not inside a directory and if you are have not published any images via FTP(images are hosted on other sites like flickr), then you no longer need a web-host.
Migrating www.yourblog.com (FTP) to www.yourblog.com (Custom Domain)
Note:- The following steps can also be used to migrate a sub-domain from FTP to Custom domain(ie blog.yourdomain.com from FTP to Custom Domain). This method cant be used for migration of a blog located at www.yourdomain.com/blog or subdomain.yourdomain.com/blog1. When you move your blog to a custom domain, you will have to move all the images to a different sub-domain on your server
2.Create a new sub-domain like files.yourblog.com and move all your images to this sub-domain (For example www.yourblog.com/uploaded_images/image1.jpg should now be accessible at files.yourblog.com/uploaded_images/image2.jpg)
3.If you are using a shared hosting service, ask your host to create a Canonical Name(CNAME) record for www with value ghs.google.com
(DNS changes are cached at many levels and your ISPs may take time to get in sync with the 13 root level domain name servers. So the changes may take time :)
4.Once your host is done with it, Log in at your Blogger Dashboard and navigate to Settings > Publishing
5.Opt For Switch to: Custom Domain (Point your own registered domain name to your blog) and switch to advanced settings
6.Type your new domain/subdomain there
and in the missing file host option type in files type the captcha and save the settings. If everything goes right, your blog has now been successfully moved to the custom domain.
What does the Missing files host do?
When blogger is not able to find a file like www.bloggerplugins.org/uploaded_images/image1.jpg , it will try to find it at files.bloggerplugins.org/uploaded_images/image1.jpg [Click on the link to see it in action]If you are hosting your blogger blog on a sub-directory, then wait for the Blogger FTP migration tool(it will be out in a couple of weeks). Once you are done with the migration tool, just follow the steps 4-6.You wouldn't need to use a missing files host in that case.
If you have any questions about the migration, leave your questions in the comments section.
How to Create Optimized Landing Pages that Convert?
Like SEO, SEM plays a major role in promoting the website to make revenues on the basis of ROI. The online business battle will be waged over conversion rates and return on investment (ROI), not traffic acquisition. The Landing page is the key factor inorder to make conversions rather than investing in an normal page.
Successful landing page
Your landing page should look like
1) Clear informative layout
2) Use Catchy Headlines, catchy titles are a plus.
3) Using contextual internal links
4) Should focus on What's the offer?
5) Who's interested?
6) Why are they interested, and why should they take further action?
7) How do they get started?
When visitors landed on the common home page, they stayed longer and visited more pages. Yet a larger percentage left without converting. When visitors landed on custom pages, they stayed for less time and viewed fewer pages. But these visitors converted two to three times more than the visitors to generic landing pages.
Make sure that you use your design part most in the header section to attract the audience. And don't use images which ever you want to convey to the audience (the important note) which will be useful for seo section. Don't forget to have an Action Button near to your conveying message. Always keep in mind that most of the visiter would be using 800X600 resolutions, so keep your design with in that screen resolutions.
Optimize your web page when you are using high quality graphic images which will save your loading time.
Successful landing page
Your landing page should look like
1) Clear informative layout
2) Use Catchy Headlines, catchy titles are a plus.
3) Using contextual internal links
4) Should focus on What's the offer?
5) Who's interested?
6) Why are they interested, and why should they take further action?
7) How do they get started?
When visitors landed on the common home page, they stayed longer and visited more pages. Yet a larger percentage left without converting. When visitors landed on custom pages, they stayed for less time and viewed fewer pages. But these visitors converted two to three times more than the visitors to generic landing pages.
Make sure that you use your design part most in the header section to attract the audience. And don't use images which ever you want to convey to the audience (the important note) which will be useful for seo section. Don't forget to have an Action Button near to your conveying message. Always keep in mind that most of the visiter would be using 800X600 resolutions, so keep your design with in that screen resolutions.
Optimize your web page when you are using high quality graphic images which will save your loading time.
How to write HTML css code for Emailers?
Many of them are asking me, how to write html css code for emailers? Do it have any formates? On my view, i say yes it has a format to write. Now a days emailers are playing a majore role to promote their products or web pages in order to increase their conversion rate. Report says that a neat simple text mailers are making lots of conversions.
There are two types of mailers. One is text mailer and another one is image based mailer. Text mailers are given most important than image mailer, coz text mail can have the users glance that what he wants. But in image mailer unless the user clicks the display images he cannot view the mail. Most of the mail engine's like Google, Yahoo will not show the images until the user click the display images. This may get user get irritated and without opening the mail he will delete it. Make sure that your mailer will not fall in their Junk box.
Format for writing E mailers
A basic html and css code writing is enough for writing E mailers. Like tables and inline style is needed. You cannot apply any css file to the emailer. While writing html code, make sure that you should not use positions, backgrounds, negative margins and also padding (in cases). You must reset your css before starting an element.
Email Compatibility
Most of the companies are looking for email compatibility for all emailers just like browser compatibility. Most of them are Gmail, Yahoo, Sify, Microsoft Outlook express, Hotmail etc.. Make sure that your code is compatible for the above mentioned email services. So please use basic html and css tags in order to render properly in all these services.
Note:
Make sure that you add a link on the top of the emailers saying that cannot view, please view it in an html format. So that they can view to page in a browser, if they have problem in opening in email. And also add disclaimers like unsubscribe(if needed) at the end of the footer.
There are two types of mailers. One is text mailer and another one is image based mailer. Text mailers are given most important than image mailer, coz text mail can have the users glance that what he wants. But in image mailer unless the user clicks the display images he cannot view the mail. Most of the mail engine's like Google, Yahoo will not show the images until the user click the display images. This may get user get irritated and without opening the mail he will delete it. Make sure that your mailer will not fall in their Junk box.
Format for writing E mailers
A basic html and css code writing is enough for writing E mailers. Like tables and inline style is needed. You cannot apply any css file to the emailer. While writing html code, make sure that you should not use positions, backgrounds, negative margins and also padding (in cases). You must reset your css before starting an element.
Email Compatibility
Most of the companies are looking for email compatibility for all emailers just like browser compatibility. Most of them are Gmail, Yahoo, Sify, Microsoft Outlook express, Hotmail etc.. Make sure that your code is compatible for the above mentioned email services. So please use basic html and css tags in order to render properly in all these services.
Note:
Make sure that you add a link on the top of the emailers saying that cannot view, please view it in an html format. So that they can view to page in a browser, if they have problem in opening in email. And also add disclaimers like unsubscribe(if needed) at the end of the footer.
Nifty rounded corners using html and css
Rounded border
HTML Code:
CSS Code:
.b1, .b2, .b3, .b4{font-size:1px; overflow:hidden; display:block;}
.b1 {height:1px; background:#888; margin:0 5px;}
.b2 {height:1px; background:#fff; border-right:2px solid #888; border-left:2px solid #888; margin:0 3px;}
.b3 {height:1px; background:#fff; border-right:1px solid #888; border-left:1px solid #888; margin:0 2px;}
.b4 {height:2px; background:#fff; border-right:1px solid #888; border-left:1px solid #888; margin:0 1px;}
.contentb {background: #fff; border-right:1px solid #888; border-left:1px solid #888;}
.contentb div {margin-left: 5px;}
Rounded Fill
HTML Code:
Css Code:
.b1f, .b2f, .b3f, .b4f{font-size:1px; overflow:hidden; display:block;}
.b1f {height:1px; background:#ddd; margin:0 5px;}
.b2f {height:1px; background:#ddd; margin:0 3px;}
.b3f {height:1px; background:#ddd; margin:0 2px;}
.b4f {height:2px; background:#ddd; margin:0 1px;}
.contentf {background: #ddd;}
.contentf div {margin-left: 5px;}
The first example will give you a rounded corner with border, simply copy the html and css code. The secound example will give you rounded corner with fill but will not have any border. You can custome the code by changing the border or background color.
If you have any doubts or queries, please feel free to contact me.
HTML Code:
Round Border!!
CSS Code:
.b1, .b2, .b3, .b4{font-size:1px; overflow:hidden; display:block;}
.b1 {height:1px; background:#888; margin:0 5px;}
.b2 {height:1px; background:#fff; border-right:2px solid #888; border-left:2px solid #888; margin:0 3px;}
.b3 {height:1px; background:#fff; border-right:1px solid #888; border-left:1px solid #888; margin:0 2px;}
.b4 {height:2px; background:#fff; border-right:1px solid #888; border-left:1px solid #888; margin:0 1px;}
.contentb {background: #fff; border-right:1px solid #888; border-left:1px solid #888;}
.contentb div {margin-left: 5px;}
Rounded Fill
HTML Code:
Round fill!!
.b1f, .b2f, .b3f, .b4f{font-size:1px; overflow:hidden; display:block;}
.b1f {height:1px; background:#ddd; margin:0 5px;}
.b2f {height:1px; background:#ddd; margin:0 3px;}
.b3f {height:1px; background:#ddd; margin:0 2px;}
.b4f {height:2px; background:#ddd; margin:0 1px;}
.contentf {background: #ddd;}
.contentf div {margin-left: 5px;}
The first example will give you a rounded corner with border, simply copy the html and css code. The secound example will give you rounded corner with fill but will not have any border. You can custome the code by changing the border or background color.
If you have any doubts or queries, please feel free to contact me.
Subscribe to:
Posts
(
Atom
)

